منتدى سرب الحمامات
مدونات سرب الحمامات
اهتمامات ستات البيوت
(للسيدات فقط)

منتدى سرب الحمامات
مدونات سرب الحمامات
اهتمامات ستات البيوت
(للسيدات فقط)

منتدى سرب الحمامات
هل تريد التفاعل مع هذه المساهمة؟ كل ما عليك هو إنشاء حساب جديد ببضع خطوات أو تسجيل الدخول للمتابعة.

منتدى سرب الحمامات

تجارب ستات البيوت الشاطرين
 
الرئيسيةسرب الحمامأحدث الصورالتسجيلدخول
بحـث


نتائج البحث
 
Rechercher بحث متقدم
Free counters!


 شبشب شتوي رووووووووووووعه

اذهب الى الأسفل 
4 مشترك
كاتب الموضوعرسالة
shaymaa-m
Admin
shaymaa-m


عدد المساهمات : 475

شبشب شتوي رووووووووووووعه Empty
مُساهمةموضوع: شبشب شتوي رووووووووووووعه   شبشب شتوي رووووووووووووعه Icon_minitimeالخميس 24 نوفمبر - 10:33

الموضوع منقوووووووول


السلام عليكم ورحمة اللله وبركاتة


النهاردة عملت شبشب للبيت علشان البرد من غير كتير ندخل على الخطوات على طول
اول حاجة نجيب قطعة قماشة مش عاوزينها ونرسم على ورق شكل قوس كدة اللى هو هيبقى كف من فوق
شبشب شتوي رووووووووووووعه 13212200923799
هنا جبت القماشة وحطيت عليها الورقة وتبست وهبتدى اقص على الشكل دة

شبشب شتوي رووووووووووووعه 13212202307751
هنحتاج قماشة تانية اى لون علشان نعمل البطانة بتعتها وهنقصها بنفس الشكل

شبشب شتوي رووووووووووووعه 13212203074227

هنا لما قصيت القماش الاساسى والبطانة
شبشب شتوي رووووووووووووعه 13212204328804
هنحتاج كمان اسفنج ونقصة بنفس الشكل

شبشب شتوي رووووووووووووعه 13212205131385
هنخيط القماش الاساسى مع البطانة ونسيب جزء صغير علشان ندخل السفنج منة وبعدين نسراج الجزء اللى سبناه كدة خلصنا الجزء اللى فوق

شبشب شتوي رووووووووووووعه 13212207064364
نيجى بقى على النعل هنحتاج كرتون تخين او نتيجة قديمة او اى حاجة بلاستيك علشان تستحمل ونقصها على شكل النعل تجيبى شبشب بتاعك وتحطيها على الكرتونة وترسمية وبعدين قصى
شبشب شتوي رووووووووووووعه 13212207298438
وبعدين نقص نفس الشكل من القماش والسفينج ونلزق السفنج على الكرتونة
بالمسدس ونخيط القماش من كل النواحى ونسيب جزء ندخل منة الكرتونة وبعدين
نسرج الجزء اللى سبناه
شبشب شتوي رووووووووووووعه 13212208773009
هيبقى بالشكل دة كدة عندنا وش الشبشب والنعل بتاعة نحط الاتنين على بعض نخيطهم صغيرة علشان ما تبنش
شبشب شتوي رووووووووووووعه 13212210069226
ودة الشكل النهائى اية رايكم بقى
الرجوع الى أعلى الصفحة اذهب الى الأسفل
دوللى
فنانه السرب
avatar


عدد المساهمات : 450

شبشب شتوي رووووووووووووعه Empty
مُساهمةموضوع: رد: شبشب شتوي رووووووووووووعه   شبشب شتوي رووووووووووووعه Icon_minitimeالخميس 24 نوفمبر - 10:58

الصور مش واضحه
الرجوع الى أعلى الصفحة اذهب الى الأسفل
mado

mado


عدد المساهمات : 2612

شبشب شتوي رووووووووووووعه Empty
مُساهمةموضوع: رد: شبشب شتوي رووووووووووووعه   شبشب شتوي رووووووووووووعه Icon_minitimeالخميس 24 نوفمبر - 21:15

طب شوفى ده كمان يا شيماء


شبشب شتوي رووووووووووووعه Socks+4


شبشب شتوي رووووووووووووعه Socks+1

شبشب شتوي رووووووووووووعه Socks+2


الرجوع الى أعلى الصفحة اذهب الى الأسفل
mado

mado


عدد المساهمات : 2612

شبشب شتوي رووووووووووووعه Empty
مُساهمةموضوع: رد: شبشب شتوي رووووووووووووعه   شبشب شتوي رووووووووووووعه Icon_minitimeالخميس 24 نوفمبر - 22:35


شبشب شتوي رووووووووووووعه Slipper%2Btutorial%2B019
Click Here To Print Off Pattern

I
needed a little pampering after the holidays. My kids go to a year
round school, which means I had them home for 4 weeks in November, sent
them back to school for 2 weeks, then got to have them back home for
winter break. Needless to say, I am ready for them to go back to school
for awhile. In celebration of them going back tomorrow, I made myself a
little "good job mom" present. My suggestion, before you begin the after
holiday clean up, take a couple hours while the kids are back to school
and make yourself a pair of these super sweet slippers, you deserve it!


I
started off with a half yard of cotton fabric (Riley Blakes Sweet
Divinity line), a half yard of pink dot minkie, and a half yard blue
felt (not pictured). I had PLENTY of fabric, I could probably make 2 or 3
more pairs of slippers, depending on the size. You'll also need my
super quick drawing of a pattern. You can print it off for free HERE!


شبشب شتوي رووووووووووووعه Slipper%2Btutorial%2B003
You'll need to adjust the pattern to fit your foot (I really hope
you're making these for yourself, because we all need a bit of
pampering!). This pattern fits me perfectly, but I am aware that I have a
rather small foot. I am a shoe size 6 and my foot's pretty narrow. If
you need to make it larger, DON'T just enlarge the pattern on the
printer, it will turn out too wide. You'll just need to add lenth (and
perhaps a very little width, depending). Start by placing your foot on
the pattern of the sole. You'll want it to be about a half inch larger
than your foot. The best way to do this would probably be to actually
cut the pattern directly in half and add inches to the middle, so it
does not distort the shape of the sole. You'll also need to do the same
to the side of the slipper. REMEMBER, these slippers are made to fit
snug, like a sock. Otherwise they will slip right off! Don't make them
too large.


On your pattern you'll see a side labled
"fold". Place that side on the fold of your fabric (as you see below)
and cut out twice from the cotton and twice from the minkie. With your
sole, cut twice from the felt and twice from your minkie. You can use
fabric instead of the felt if you want, I just had a hard time thinking
about walking around my dirty floors which such pretty fabric on the
bottom of my slippers.


شبشب شتوي رووووووووووووعه Slipper%2Btutorial%2B004
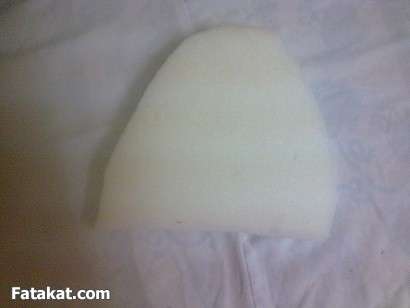
Here is a picture of what you should have cut out for the outside of
the slippers. You'll need all these same pieces cut out of the minkie as
well. Make sure that you cut a right and a left foot! *see below*
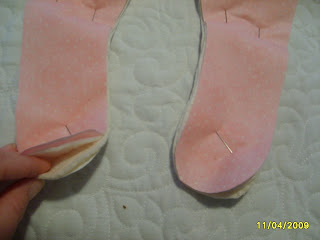

شبشب شتوي رووووووووووووعه Slipper%2Btutorial%2B005Pair
up an outside piece and an inside (minkie) piece and pin them together,
right side together. When you are working with minkie you'll want to
pin REALLY well. The stuff is so stretchy and so slippery. If it wasn't
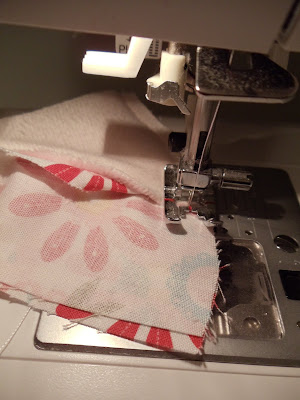
for how wonderfully soft it is, I would never, ever sew with it. Sew a
scant seam along the inside curved edge.
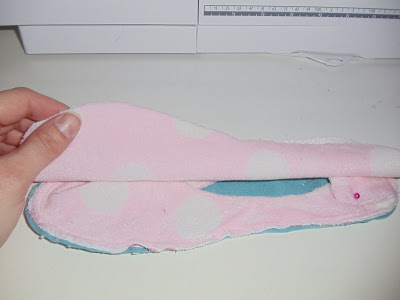

شبشب شتوي رووووووووووووعه Slipper%2Btutorial%2B006You'll
then fold the lining and material apart, and place the edges on the
bottom (where the heel will be) right side together, with the lining
against the lining and the material against the material...


شبشب شتوي رووووووووووووعه Slipper%2Btutorial%2B009
I hope you can see that OK in the picure above. Make sure that minkie
is touching minkie and cotton is touching cotton. Sew along that egde.
This will make the heel. *see below*


شبشب شتوي رووووووووووووعه Slipper%2Btutorial%2B010
You'll now turn it right sides out so it resembles the top of your
slipper. Pin it in place, all the way around, like I've done in the
picture.


شبشب شتوي رووووووووووووعه Slipper%2Btutorial%2B011You'll
now want to sew the lining and the outside together. Sew a scant seam
all the way around the slipper top. See my picture below...


شبشب شتوي رووووووووووووعه Slipper%2Btutorial%2B014
Now to attach the sole. Turn the slipper top so you see the minkie side
and pin that to the felt sole piece. You'll notice here that you need
to pay attention if you are making the right foot or the left foot. Make
sure that you turn one of the soles around so that you don't end up
with 2 left feet.


شبشب شتوي رووووووووووووعه Slipper%2Btutorial%2B015Now
sew where you have pinned, all the way around the sole. Once that is
done, place a LINING SOLE on top of the WHOLE THING. Make sure that your
get the extra fabric out of the way of the seams (as you can see in the
picture, I pinned mine out of the way). Pin it in place (always pin!)
and sew almost all the way around. Leave a small whole on the side,
where you can easily reach in and hand stitch it closed, to turn it
right side out.


شبشب شتوي رووووووووووووعه Slipper%2Btutorial%2B016Turn your slipper right side out, hand stitch your turning whole closed and slip it on for size.


شبشب شتوي رووووووووووووعه Slipper%2Btutorial%2B017Adding a cute little felt flower and a button (you can find my list of felt flower tutorials HERE!) gives it just the right touch.


شبشب شتوي رووووووووووووعه Slipper%2Btutorial%2B019My
favorite place to nap? Up in the top bunk of my daughters' bunk bed,
right after I make the bed, wondering what my 6 year old is doing right
now at school. Ahhh, a few minutes peace...


شبشب شتوي رووووووووووووعه Slipper%2Btutorial%2B020
... Until my 3 year old pokes her little head over the rails and tells
me she's playing "princess barbies take a bath". Oh please let it not be
in the toliet!
الرجوع الى أعلى الصفحة اذهب الى الأسفل
mado

mado


عدد المساهمات : 2612

شبشب شتوي رووووووووووووعه Empty
مُساهمةموضوع: رد: شبشب شتوي رووووووووووووعه   شبشب شتوي رووووووووووووعه Icon_minitimeالخميس 24 نوفمبر - 22:38

شبشب شتوي رووووووووووووعه S6002831
Once you have all your peices cut, assemble them as shown below -
Base: Bottom peice, Interfacing, 2x wadding peices (for extra padding) and then your inside peice.

Slipper
top needs to assembled - wadding peice, Inside peice (facing up) and
the feature peice (facing down) so fabric is right sides together, then
interfacing on top.


شبشب شتوي رووووووووووووعه S6002835

شبشب شتوي رووووووووووووعه S6002837

Once you have pinned them, stitch around each base holding all 5 layers together

شبشب شتوي رووووووووووووعه S6002840
Then sew around the inner curve of your top peice

شبشب شتوي رووووووووووووعه S6002843
Unpin the top peices, and you will need to pull the top fabric around to the other side ~ wiggle and press till nice and flat.


شبشب شتوي رووووووووووووعه S6002844

شبشب شتوي رووووووووووووعه S6002845
Topstitch around the inner curve...

شبشب شتوي رووووووووووووعه S6002848
Pin
the tails of the top peice with feature fabric (top fabric) right sides
together, sew along the edge securely - here I've added a binding to
hide the edge or you can leave it raw.


شبشب شتوي رووووووووووووعه S6002853
Pin the top section to your base with your feature fabric and outside of bottom peice to the inside.

شبشب شتوي رووووووووووووعه S6002854
Carefully
sew around the outside edge ensuring you're sewing through all layers
really well, overlock or zig zag around the edge too.


شبشب شتوي رووووووووووووعه S6002856

شبشب شتوي رووووووووووووعه S6002858
Turn inside out - and you have a lovely pair of Ballet Slippers

شبشب شتوي رووووووووووووعه S6002861
Now embellish! These ones got a little bow on each side.


شبشب شتوي رووووووووووووعه S6002870
These got some cute crochet lace...


شبشب شتوي رووووووووووووعه S6002881
Again some crochet lace with some little buttons!

شبشب شتوي رووووووووووووعه S6002880
And finally some pink Ric Rac! Yo-yo's would be a great idea too!

شبشب شتوي رووووووووووووعه S6002879
الرجوع الى أعلى الصفحة اذهب الى الأسفل
shaymaa-m
Admin
shaymaa-m


عدد المساهمات : 475

شبشب شتوي رووووووووووووعه Empty
مُساهمةموضوع: رد: شبشب شتوي رووووووووووووعه   شبشب شتوي رووووووووووووعه Icon_minitimeالأحد 27 نوفمبر - 12:27

الله حلو اوي يا ولاء


دوللي الصور انا شايفاها
طب شوفيه ف الاعمال اليدوية ف فتكات
الرجوع الى أعلى الصفحة اذهب الى الأسفل
omyosef
ملكه العزايم ومديرة مطبخ السرب
avatar


عدد المساهمات : 704
الموقع : k.s.a

شبشب شتوي رووووووووووووعه Empty
مُساهمةموضوع: رد: شبشب شتوي رووووووووووووعه   شبشب شتوي رووووووووووووعه Icon_minitimeالأربعاء 30 نوفمبر - 23:28

حلوين اوي يابنات بجد نفسي اجيب ماكنه هههههه

اصل عندي فراغ قاتل مش عارفه استغل وقتي في ايه هههه

لا بجد الماكنه مهمه اوي في البيت
الرجوع الى أعلى الصفحة اذهب الى الأسفل
shaymaa-m
Admin
shaymaa-m


عدد المساهمات : 475

شبشب شتوي رووووووووووووعه Empty
مُساهمةموضوع: رد: شبشب شتوي رووووووووووووعه   شبشب شتوي رووووووووووووعه Icon_minitimeالأحد 4 ديسمبر - 12:41

ههههههههههههههههه
شغال يا هبه
هاتي انتي الماكنه مادام عندك وقت فراغ ههههههههه بتهزري
الرجوع الى أعلى الصفحة اذهب الى الأسفل
 
شبشب شتوي رووووووووووووعه
الرجوع الى أعلى الصفحة 
صفحة 1 من اصل 1
 مواضيع مماثلة
-
» افكار واشكال لتزيين السلطات رووووووووووووعه

صلاحيات هذا المنتدى:لاتستطيع الرد على المواضيع في هذا المنتدى
منتدى سرب الحمامات :: الاعمال اليدويه لسرب الحمامات :: خياطة-
انتقل الى: